In this post, I will show how you can add, delete and update labels for multiple posts in Blogger.
Apparently, there is no quicker way to do this yet so here it goes.
Before we begin, take note that not all your posts may be visible so you might have to adjust the list size as shown in the image below. If you can't fit all the posts into a single page, you will have to repeat the steps until you updated all posts.
 Adjust the number of posts displayed in the first page.
Adding a label to multiple posts.
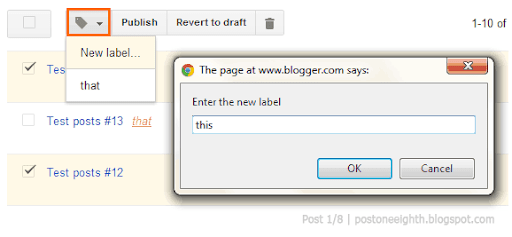
Now from your blog dashboard, go to Posts » All. Next, select which posts you want to add a label to. After making your selection, click on the Labels icon and select "New label..." to create a new label or just select from the list if your label already exists.
 Adding a new label to your selected posts.
Removing a label from multiple posts.
From your blog's dashboard, select Posts » All. Next, filter the list to show only the posts tagged with the label to remove by selecting it from the labels list.
 Select the label to delete to filter your post list.
Now that the list is filtered, select which posts to remove the label from. After selecting, click on the Labels icon and select the label to remove. Note that once a label is no longer associated with any post, it will be automatically removed from the labels list.
Editing a label on multiple posts.
Editing labels is a bit tricky and I always mess up when doing this. This involves the steps in adding a new label and removing a label.
Similar to removing labels, first filter the list to show only posts tagged with the label to edit. After filtering the list, select all posts. Now click on the Labels icon to create a new label and give it the new name of the label you want to edit (for example, update "this" to "these"). Once all the posts are updated with the new label, click again on the Labels icon to remove the old label name.
If you only want to change the capitalization of your label (e.g. from "this" to "This"), you have to use a different word (e.g. "This 2") for your new label. After updating the posts with the new label, remove the old label "this" then edit (once again) the label "This 2" to "This".
The process is pretty cumbersome and hopefully Blogger will have a better way of editing labels in the future. Anyway, if there's anything I missed or messed up, feel free to leave a comment.

The suggestion you provide is nice!! And I think you should move to premium domain. Thanks
ReplyDeleteThank you! This was helpful! :)
ReplyDeleteThis comment has been removed by the author.
ReplyDeleteHey, thank you for the detailed explanation. I've placed the link to this article in my own post so that more bloggers can benefit from it. Tks again! :)
ReplyDeleteThank you soooo much for this! It was making me crazy trying to figure out how to get rid labels.
ReplyDeletei like this post!!!!awsme
ReplyDeleteNice post
ReplyDeleteSuper Awwesome Post buddie......You've a great work.... Hats of..(Y)
ReplyDeleteNice! Can you edit the text of a label after it's created & used?
ReplyDeleteThis is nice, it really helped me understand. I'm a novice.
ReplyDeleteGreat tutorial. Thanks for sharing
ReplyDelete