UPDATE [2013-03-14]: It looks like Blogger has updated a lot of things on its Template Editor since the time of this writing so, I've added some updates on the notes that needed updating (??). I've marked them with "UPDATE" or a strikethrough and I hope this won't confuse you (or myself).
I've always wanted to create my own Blogger template and tried so many times before but couldn't really get it right. I think I finally understood a somehow large chunk of it. I think.
Anyway, here in this post, I will note about the things I have learned/will learn in creating your own template. I won't be getting into much detailed stuff on HTML and CSS how to's. I'm assuming that you already have basic knowledge on these subjects and that you know your way around Blogger. Still, if you have any questions or there is something I didn't explain well, just feel free to leave a comment, and hopefully I can answer it.
Also, since I am also just learning about this, please don't expect a fully functional and Template-Designer-compatible template -- especially since I don't really use the Template Designer. However, I will try to make it as flexible as possible.
If you are to follow along the stuff I will note below, here are some suggested steps on getting started:
- Create a new blog for your test template, if you haven't got one yet and select a Simple template. It's best if everything is in its default state. This way, you can really see the changes you apply in your template. Also you wouldn't want to play around with your live blogs and unintentionally mess it up.
- Before making any changes, download a copy of the template (Template » Backup/Restore) for reference.
- For your test blog, in the Layout page, remove all widgets (Archive, Profile, Lists...) except for Blog Posts. If you can't get rid of the Header and Attribution widgets, edit the template (Template » Edit HTML) and search for
Header1. On that line of code, changelocked='true'tolocked='false'. Do the same for the Attribution by searchingAttribution1. Once done, go back to the Layout page and try deleting them. Hopefully that should work. UPDATE: Removing the widget in Blogger's HTML editor will also remove the widget from your template layout (unlike before). Yay! - Once you remove all possible widgets, create a New Post. You can use default text templates found here at Html Ipsum. These templates already consists of HTML tags you would normally use in a blog post. Having a test post like this will be a big help in designing your template.
- Also, don't forget to set your test blog's privacy settings - Not listed on Blogger; Not visible to search engines. If you won't be using external apps for further testing, you can also set the permission (Blog readers) to Blog author instead of Anyone.
Now onto the code and stuff. If you are editing your template's xml file in a different editor (like Notepad++) other than Blogger's, be sure to set its encoding to UTF-8 without BOM.
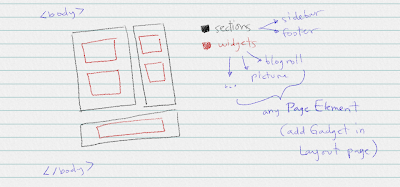
Understanding the <b:section> and <b:widget> tags
Must read: Intro, Section and Widget attributes. This page gives a brief explanation of the Section and Widget parts of the template. Also the attributes of the <b:section> and <b:widget> tags are listed here which we will use later on.
So I made some tests and this is the leanest code I can upload to Blogger. This, by the way, is based on the Simple template - well at least the first 15 or so lines.
<?xml version="1.0" encoding="UTF-8" ?>
<!DOCTYPE html>
<html b:version='2' class='v2' expr:dir='data:blog.languageDirection' xmlns='http://www.w3.org/1999/xhtml' xmlns:b='http://www.google.com/2005/gml/b' xmlns:data='http://www.google.com/2005/gml/data' xmlns:expr='http://www.google.com/2005/gml/expr'>
<head>
  <meta content='IE=EmulateIE7' http-equiv='X-UA-Compatible'/>
  <b:if cond='data:blog.isMobile'>
    <meta content='width=device-width,initial-scale=1.0,minimum-scale=1.0,maximum-scale=1.0' name='viewport'/>
  <b:else/>
    <meta content='width=1100' name='viewport'/>
  </b:if>
  <b:include data='blog' name='all-head-content'/>
  <title><data:blog.pageTitle/></title>
  <b:skin>
  </b:skin>
</head>

<body>

  <b:section id='header' class='header' maxwidgets='' showaddelement='yes'>
  </b:section>

</body>
</html>
I tried leaving out the <b:skin/> tags but I get a
We were unable to save your template. Your template could not be parsed as it is not well-formed. Please make sure all XML elements are closed properly. XML error message: (SyntaxError) : Unexpected token <
UPDATE: The XML error message now says "There should be one and only one skin in the template, and we found: 0"
Also, the <body> cannot be left empty. It should always at least have a <b:section> tag. Otherwise you would encounter this error:
... XML error message: Could not find a preferred section to add deleted widgets to.
UPDATE: The XML error message now says "We did not find any section in your template. A template must have at least one b:section tag."
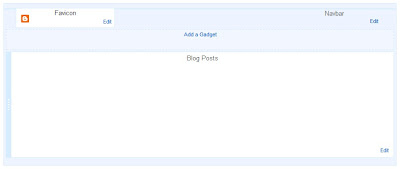
So after uploading the template (Fig.3), a quick preview shows me this:
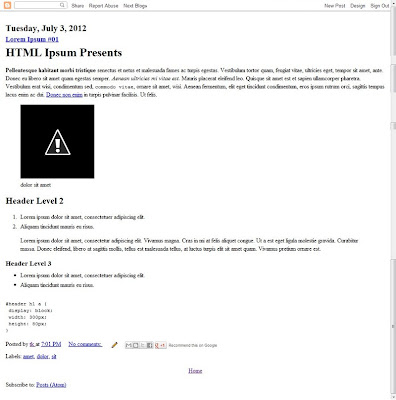
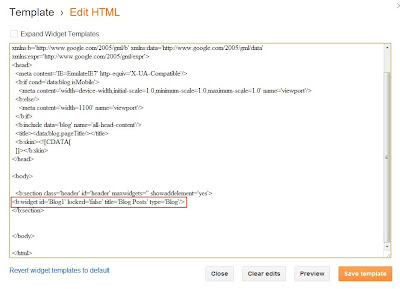
As seen on the Layout page (Fig.1) and on the preview (Fig.4), the Blog widget will always be set. So looking at the HTML code in Blogger (Template » Edit HTML), you will see that a UPDATE: If you uploaded the template in Fig.3, what you would actually see is an empty page because the Blog widget will no longer be automatically created. You have to add this yourself for you to view any post on the page.
<b:widget id='Blog1' locked='false' title='Blog Posts' type='Blog'/> has been inserted in between the <b:section> tag we created. Note that the id I used for this section is header. This I will change in a bit since I don't think we should leave the Blog widget inside this header section.
Ok so now fixing the Blog widget's location. I created a new <b:section> tag, with an id main for the Blog widget and updated the attributes of the header section. So now we get this:
<body>

  <b:section id='header' class='header' maxwidgets='1' showaddelement='yes'>
  </b:section>

  <b:section id='main' class="main" maxwidgets='' showaddelements='yes'>
    <b:widget id='Blog1' locked='false' title='Blog Posts' type='Blog'/>
  </b:section>

</body>
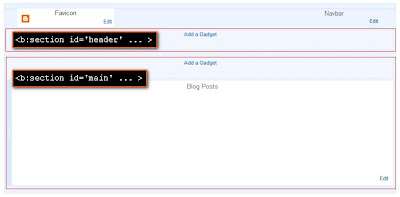
Now that we have an Add a Gadget option for the header section in the Layout page, let's add a Page Header widget. Then on the Edit HTML part of the Template page, you will see the Page Header widget right below the <b:section id='header' ...> tag. Note: Just leave the Expand Widgets Templates unchecked. We won't be needing this just yet.
As a precaution to prevent deleting the Header when someday we are drowsily updating our blog template, set the header's locked attribute to true.
By now, you can probably see the pattern of Blogger's template code. We create sections in the template and specify its attributes. Then on the Layout page, we can add widgets (using Add a Gadget) to the section we have created. Note that we don't necessarily have to use Add a Gadget to add a widget to our template. You can do this manually by coding it in your template.
So for example, I would like to add an HTML/Javascript widget below my blog posts. So following this link mentioned earlier, we can see the syntax and attributes of a <b:widget> tag. I would then code my template like this:
<body>

  <b:section id='header' class='header' maxwidgets='1' showaddelement='yes'>
    <b:widget id='Header1' locked='true' title='Testground (Header)' type='Header'/>
  </b:section>

  <b:section id='main' class="main" maxwidgets='' showaddelements='yes'>
    <b:widget id='Blog1' locked='false' title='Blog Posts' type='Blog'/>
    <b:widget id='HTML1' locked='false' title='Test HTML widget' type='HTML' />
  </b:section>

</body>
Then, checking the Layout page, we can see that my HTML/Javascript widget is right in its place.
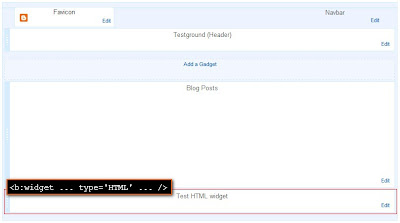
Deleting widgets, however, can't be removed by deleting it from the template code. You need to remove it via the Layout page itself (Edit » Remove). If the Remove option isn't visible on the Edit widget window, check that the widget's locked attribute is set to falseAs mentioned earlier, deleting widgets can also be done now in Blogger's HTML template editor.
Let's now move on to defining the rest of the Sections of our template. Normally, it should have a Header, Navbar, Content, Sidebar and Footer. We already have our Header and Content (main) so let me just add the missing ones.
So after adding the sections along with some widgets, I now have this:
<body>

  <b:section id='header' class='header' maxwidgets='1' showaddelement='yes'>
    <b:widget id='Header1' locked='true' title='Testground (Header)' type='Header'/>
  </b:section>

  <b:section id='nav' class='nav' maxwidgets='1' showaddelements='yes'>
    <b:widget id='PageList1' locked='false' title='Pages' type='PageList'/>
  </b:section>

  <b:section id='main' class='main' maxwidgets='' showaddelements='yes'>
    <b:widget id='Blog1' locked='false' title='Blog Posts' type='Blog'/>
  </b:section>

  <b:section id='sidebar' class='sidebar' maxwidgets='' showaddelements='yes'>
    <b:widget id='CustomSearch1' locked='false' title='Search' type='CustomSearch'/>
    <b:widget id='BlogArchive1' locked='false' title='Archive' type='BlogArchive'/>
  </b:section>

  <b:section id='footer' class='footer' maxwidgets='' showaddelements='yes'>
    <b:widget id='Attribution1' locked='false' title='' type='Attribution'/>
  </b:section>

</body>
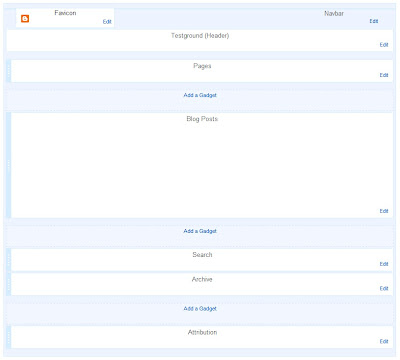

Some notes:
- For the
<b:section id='nav' ... >tag, I tried using navbar as the id earlier but it wouldn't show up in the saved template and Layout page. It was because the id navbar is already in use. See the navbar widget on the Layout page? I should have noticed that earlier :| - Using an invalid id for the widget (e.g. Pagelist1 instead of PageList1) will generate an error.
- I can't find a complete list of widget types so that I end up using Add a Gadget to install a widget (e.g. PageList, CutomSearch...) then edit its attributes on the template file. If anyone knows where to find one, I'd appreciate a holler..
- There can be multiple instances of the same widget type. Just be sure to set a different id for each widget - [widgetType][number] (e.g. HTML1, HTML2)
- I tried removing the title attribute from the PageList in the code but it still remained in the Layout until I removed it via the Gadget's settings.
- If you are to use you a fluid layout for your blog instead of Blogger's mobile version, I suggest removing the entire
<b:if cond='data:blog.isMobile'>block within the<head>tag and replacing it with<meta content='width=device-width,initial-scale=1.0' name='viewport'/>instead.
I think I finally got the Section and Widget basics covered. All you would need now is to style your template and fix the layout using CSS and I guess you would be good to go. For customizing certain areas on your template, I'll be writing separate blog posts for it. But if you want to jump right into customizing your widgets, here is another must-read.
So if you have any questions, don't hesitate to leave a comment and let's see if we can figure it out. Cheers!
There's a list of valid widget types on this page
ReplyDeleteit's helpful information and a good starter point for who want to dive!!!
ReplyDeleteThank you.
Thank you for this wonderful post! It helps me understand their new coding. I've been wanting to make blogger templates, but since they've change it, I got myself a little confused on everything. I'm only good on making Wordpress Themes, haha!
ReplyDeletexoxo, www.itsmedeann.com :)
thank you for this great post
ReplyDeletejust switched to blogger coming from drupal and wordpress
i am not bad in coding templates but need to get some input for blogger
cheers :D
Thanks for the post !!! Great tutorial. will create a new template soon !!
ReplyDeletegreat tutorial thankyou
ReplyDeleteReally Really Thank you so much.
ReplyDeleteI’m new to Blogger and I’m helping a friend customize a new Blog for her team. I got them started but I want to dive in to creating something from scratch. I’m not an expert web designer by any means so this post will definitely help me get started on that project. Thank you.
ReplyDeleteThanx, helped me
ReplyDeleteGreat post!! Searched google over and over. This post is perfect to start makin a blogger template.
ReplyDeleteim not able to delete all widgets :/ the header and the attribution i do what you said and then i remove them in layout and then when i click save it says error and makes me refresh and its back.
ReplyDeletesame with deleting the whole widget in html.
I dont know how to get it to work
nice work thanks ^^
ReplyDeletethank you friend plz visite my blog(;
ReplyDeletehttp://arabetutorial.blogspot.com/
Good Tips
ReplyDeleteVery Nice.... Bro... I like the way you explained :)
ReplyDeleteThanks
Thanks your post was really hlpful :)
ReplyDeleteHi,
ReplyDeleteThese instructions worked so far, but I noticed that none of my blog titles or hyperlinks work. The ONLY hyperlink that works is the one at the bottom "powered by Blogger"
The "edit" button on the gadgets works, but the "quick edit" button on the blog post doesn't work, as do none of the other things that should be active hyperlinks.
GB
Great Information thnks
ReplyDeletereally thank you.
ReplyDeleteGood tutorial - just what I was looking for. Thanks
ReplyDeleteThank you for sharing :)
ReplyDeleteNice post....
ReplyDeleteThank very much! Definitely your post is good and full of information
ReplyDeletethe article is really helped me ... i have started learning something about coding and many stuff :) thank you...
ReplyDeletei have learning more about template design on :- http://techgmind.blogspot.com/2014/02/how-to-create-blogger-template-from.html
this blog also provide too tutorials on blogger template and design
Anyone want html and css tutorials can visit.
ReplyDeleteUcssTutorials:www.ucsstutorials.in
too good
ReplyDeleteIts a very hard to create blogger template of high class design I suggest to download ready Blogger Template from Internet.
ReplyDeleteThis post was really helpful. Also love the way you explain. Thank you.
ReplyDeleteHi,
ReplyDeleteThis might be a dumb question, but can you please go over how to edit CSS on Blogger? I am not sure if that's an option since ther's only "HTML editor" available.
Thanks
Thank you very much! I am new to coding and so is trying to design my own template. Thank you again!
ReplyDeleteI know I can make it better, thanks for your share
ReplyDeleteit will be great if you make this tutorial on video like this: https://www.youtube.com/watch?v=rg-plkkl9hE
ReplyDeletesadly it wrote on Indonesia Language Y_Y
it will more easy to understand for begginer like me
Very helpfull, tanks for your share
ReplyDeletehow to create Landing Page from scratch in blogger?
ReplyDeleteSaved my lifeee!
ReplyDeletethank you sooo much. :D :D :D
ReplyDeletegood you guyz
ReplyDeleteHello, Tk! :)
ReplyDeleteI'd like to thank You for this article - it helped Me a lot in the beginning of learning how to construct Blogger templates from scratch. Especially helpful was that You've obtained as leanest code as possible using back engineering. This saved much effort - and only Your article has that attitude.
Today I have much more freedom in terms of how much I am able to achieve in the design. Thank You very much!
I've also written a similar article - but rather from the conceptual side, than code-wise. It also may be helpful for Beginners:
http://thomasleighdiary.blogspot.com/2016/05/blogger-templates-from-scratch.html#post
Have a nice day!
Thomas
soooo thinks it work
ReplyDeleteReally Nice Work :)
ReplyDeletewell
ReplyDeleteGreat post.
ReplyDeletethanks bro i was looking for this stuff
ReplyDeleteReally excellent post. Your work is very excellent. I appreciate your work. Thanks for sharing a nicep post with us
ReplyDeleteIt was wondering if I could use this write-up on my other website, I will link it back to your website though. Great Thanks.
ReplyDeleteHTML basics for SEO
Thanks for showing me a new technique.I loved it.
ReplyDeleteThanks a lot.
ReplyDeleteReally great post
ReplyDeleteGreat
ReplyDeleteThanks for sharing your wonderful Blog.
ReplyDeletetksh for asharing, i wake template and i will show you
ReplyDeletegreat post bro
ReplyDeleteDear Sir,
ReplyDeletei have a blogger slider which shows on pc but not shows on mobile.
whenever we open our blog slider doesn't show but when we open our blog site on pc slider shows n works well.
plz guide me what code should i use so that slider can show on mobile site.
Thanx Sir.
very well explained tutorial. I learned how to add a widgets using HTML editor. Thanks.
ReplyDeleteThanks for help. Now I am learning to make my own template. How to split a section in two parts.
ReplyDeleteThats amazing!
ReplyDeletethank's you for this post.
ReplyDeletethank you so much ! best post
ReplyDeleteThis is a great post. After reading this post I can make my own template easily.
ReplyDeleteThanks for sharing.
This tutorial is awesome. It's have been months since I wanted to make a blogger template myself.
ReplyDeleteI keep using blogger for its free service. I used blogspot for writing short articles. Something that I didn't bother about the blog's performance.
But someday, the visitors a reached more than 300 a day. I put some stuffs to sell on the blog and they were sold.
So, I just want to make the blog looks much better although it is free.
Thank you very much !
thanks..
ReplyDeleteThank you so much
ReplyDeleteThanks Bro Nice Work
ReplyDeleteThanks Bro
ReplyDeleteAnd this post is still relevant in 2024. yes im from the future
ReplyDeleteVery well explained. I really thank to you, because your basic code in designing blogspot templates is really² works. Lucky me, I found your post in 2024, and your article still works. Wonderful ,,, great salute for you sir!
ReplyDeleteOut dated code z
ReplyDeleteDoes the tutorial still work?
Delete